
|
|
|||
|
|
|||
|
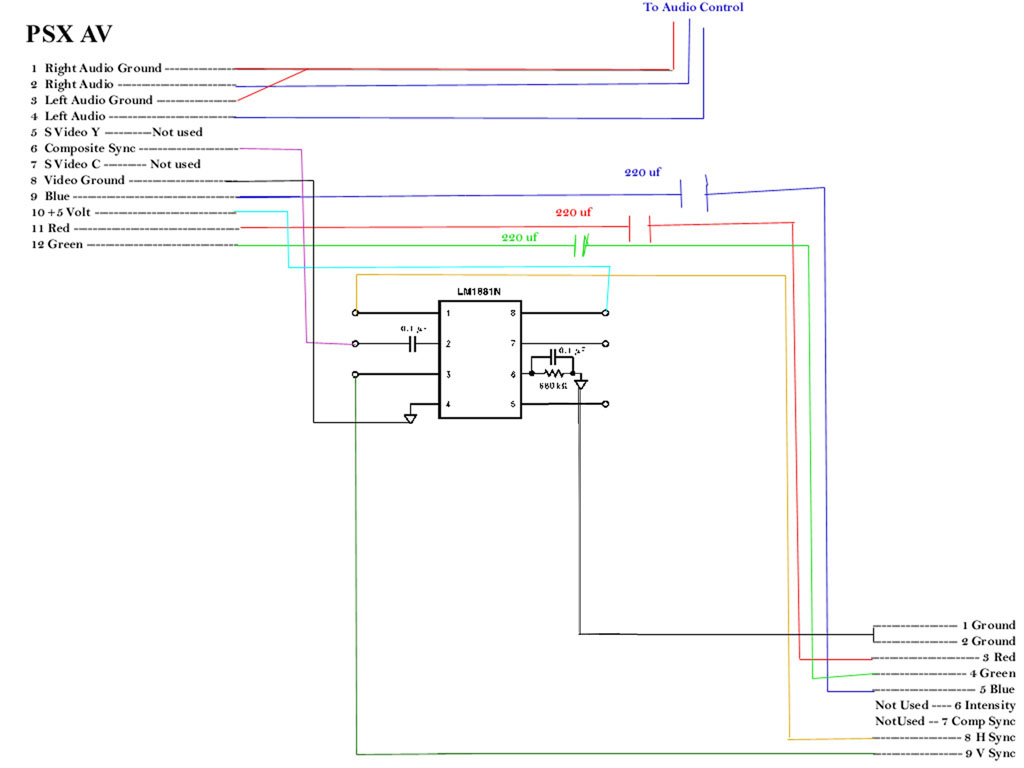
Time to update this page a little. It's been a while since I wrote it, and apparently it's still not quite clear enough for a lot of people. This is v2.0 - all shiny and edited and clarified. First off, as discussed in the Video Primer, any console without composite sync output will need an LM1881 (or similar) circuit. Luckily most consoles do output composite sync, only a few output only composite video. This is not, however, the only problem you will have to overcome. ![[- Monitor -]](../grafx/monitor.gif)
You will need a suitable monitor. The monitor must be an RGB monitor. Those of you in Europe should be able to easily get a SCART-capable TV, which for our purposes, is the same as RGB. And if you have one of those, armed with a compatible cable, you might as well stop reading now and go play. A VGA monitor will not work. With only a few exceptions, a VGA monitor will not synchronize with a video display below 15kHz horizontal sweep. Check your users guide, it will list the supported frequencies. Current VGA monitors have a minimum horizontal scan rate of about 30kHz. To adapt the output of a game console to a higher scanning frequency is usually more expensive than buying another monitor! For example, an upscan convertor can cost upwards of $200, where an old Amiga RGB monitor can be found for $25+. Amiga monitors will work (the Commodore 1084 is a favourite). Atari ST (Colour) monitors should work, with some effort. Arcade monitors (Raster only!) will work. Certain early model NEC Multisync monitors will work. Very few others will. EGA and CGA monitors will not work - they utilize a digital signal format and you'll only irritate yourself trying to wire these up. If you do not have a suitable monitor, especially VGA, DO NOT USE IT!! You will, at best, shut down your monitor temporarily. At worst, a very nasty sounding high pitched whine, and then silence as your monitor kills itself trying to do what you want. |
|||
|
|
|||
Amiga monitors have several plugs - DB9, 8 pin DIN... Some Atari monitors use a VERY nonstandard 13 pin DIN, and VGA monitors use a mini DB-15. Your console will almost certainly use a nonstandard plug. Exceptions include the NEO GEO Cart and CD, and Genesis. Some systems, the TurboGrafx included, have no port and will require a hole to be cut in the machine's shell. Think carefully about what you're going to be hooking it up and where you're going to make the hole. I recommend a DB-9 plug for all your work. It has enough pins to carry RGB information, NTSC Video/Sync, Stereo sound, S-Video signals, +5 volts and ground. It's also very common, and cheap. In addition, you can purchase any PC serial cable extension to use as an extension for your new creation. In the interests of making some sort of standard, I've included the pinout here. ![[- DB 9 -]](../grafx/conn_dsub9m.gif)
My custom plug |
|||
|
|
|||
| You will need an RGB cable for your machine (In almost all cases). These can usually be ordered from any serious game store, as almost all accessory makers produce one. In Japan all console makers make one. No console maker provides a first-party cable for the North American market. The lack of a unified plug format makes this impossible. There is a standardized European plug called a SCART connector, which can carry RGB and S-video along with stereo sound and composite video. Check here for more info on different video formats. An identical looking connector, (shown here) is used in Japan, but it carries different signals. | |||
|
|
|||
|
Once you've got your RGB cable and determined what kind of connector you need for your monitor, cut the existing end off the cable. Remember that you won't need it anymore. Using the console pinouts found here and an ohmmeter, you can determine which wire in the cable is attached to which pin on the connector. From that point it's a simple matter of attaching the appropriate wire to the proper pin on the monitor connector.
If you use my DB9 plug, you will need all of the wires listed in that diagram, barring the S-video signals. Attach the appropriate wires to the proper pins, paying close attention to the quality of your work: shorted wires will mean major headaches! Once you've attached the proper end to the console's cable, you're done! Simply plug it in and play! |
|
All contents (c)1999 Game Station X unless otherwise noted. All trademarks copyright of their respective companies. Game Station X assumes absolutely no responsiblility whatsoever for any sort of damages incurred while either viewing this information or doing anything with said information. If you don't like it, change the channel. Some of this information may have come from other sources, and Game Station X in no way implies ownership of this information, and merely intends to provide a convenient source for finding this information. That said, we wrote this, and would appreciate your not lifting it for your own page without due credit. Mail us! |
![[- 8-pin DIN plug -]](../grafx/conn_din8cm.gif)
![[- SUN Computer connector -]](../grafx/suncon.gif)